GPU Computing in the Cloud with MATLAB
Introduction
I’m writing these words on a 2012 MacBook. It’s a great machine for general scientific computing, but the GPU is dated and not viable for deep learning. Enter cloud computing…
In this post, we’ll stand up a MATLAB desktop on Amazon Web Services (AWS), which supports GPU computing. We’ll use a reference architecture by John Fluet that I felt was really well done. I followed the reference architecture to the letter, but these architectures are generic by design, so I’ll elaborate on the details, describing the options/choices made, and the pitfalls I encountered. The end result, a MATLAB desktop environment with GPU support, is shown in Figure 1. Excluding the AWS account creation and services access, the steps should take ~15 minutes.
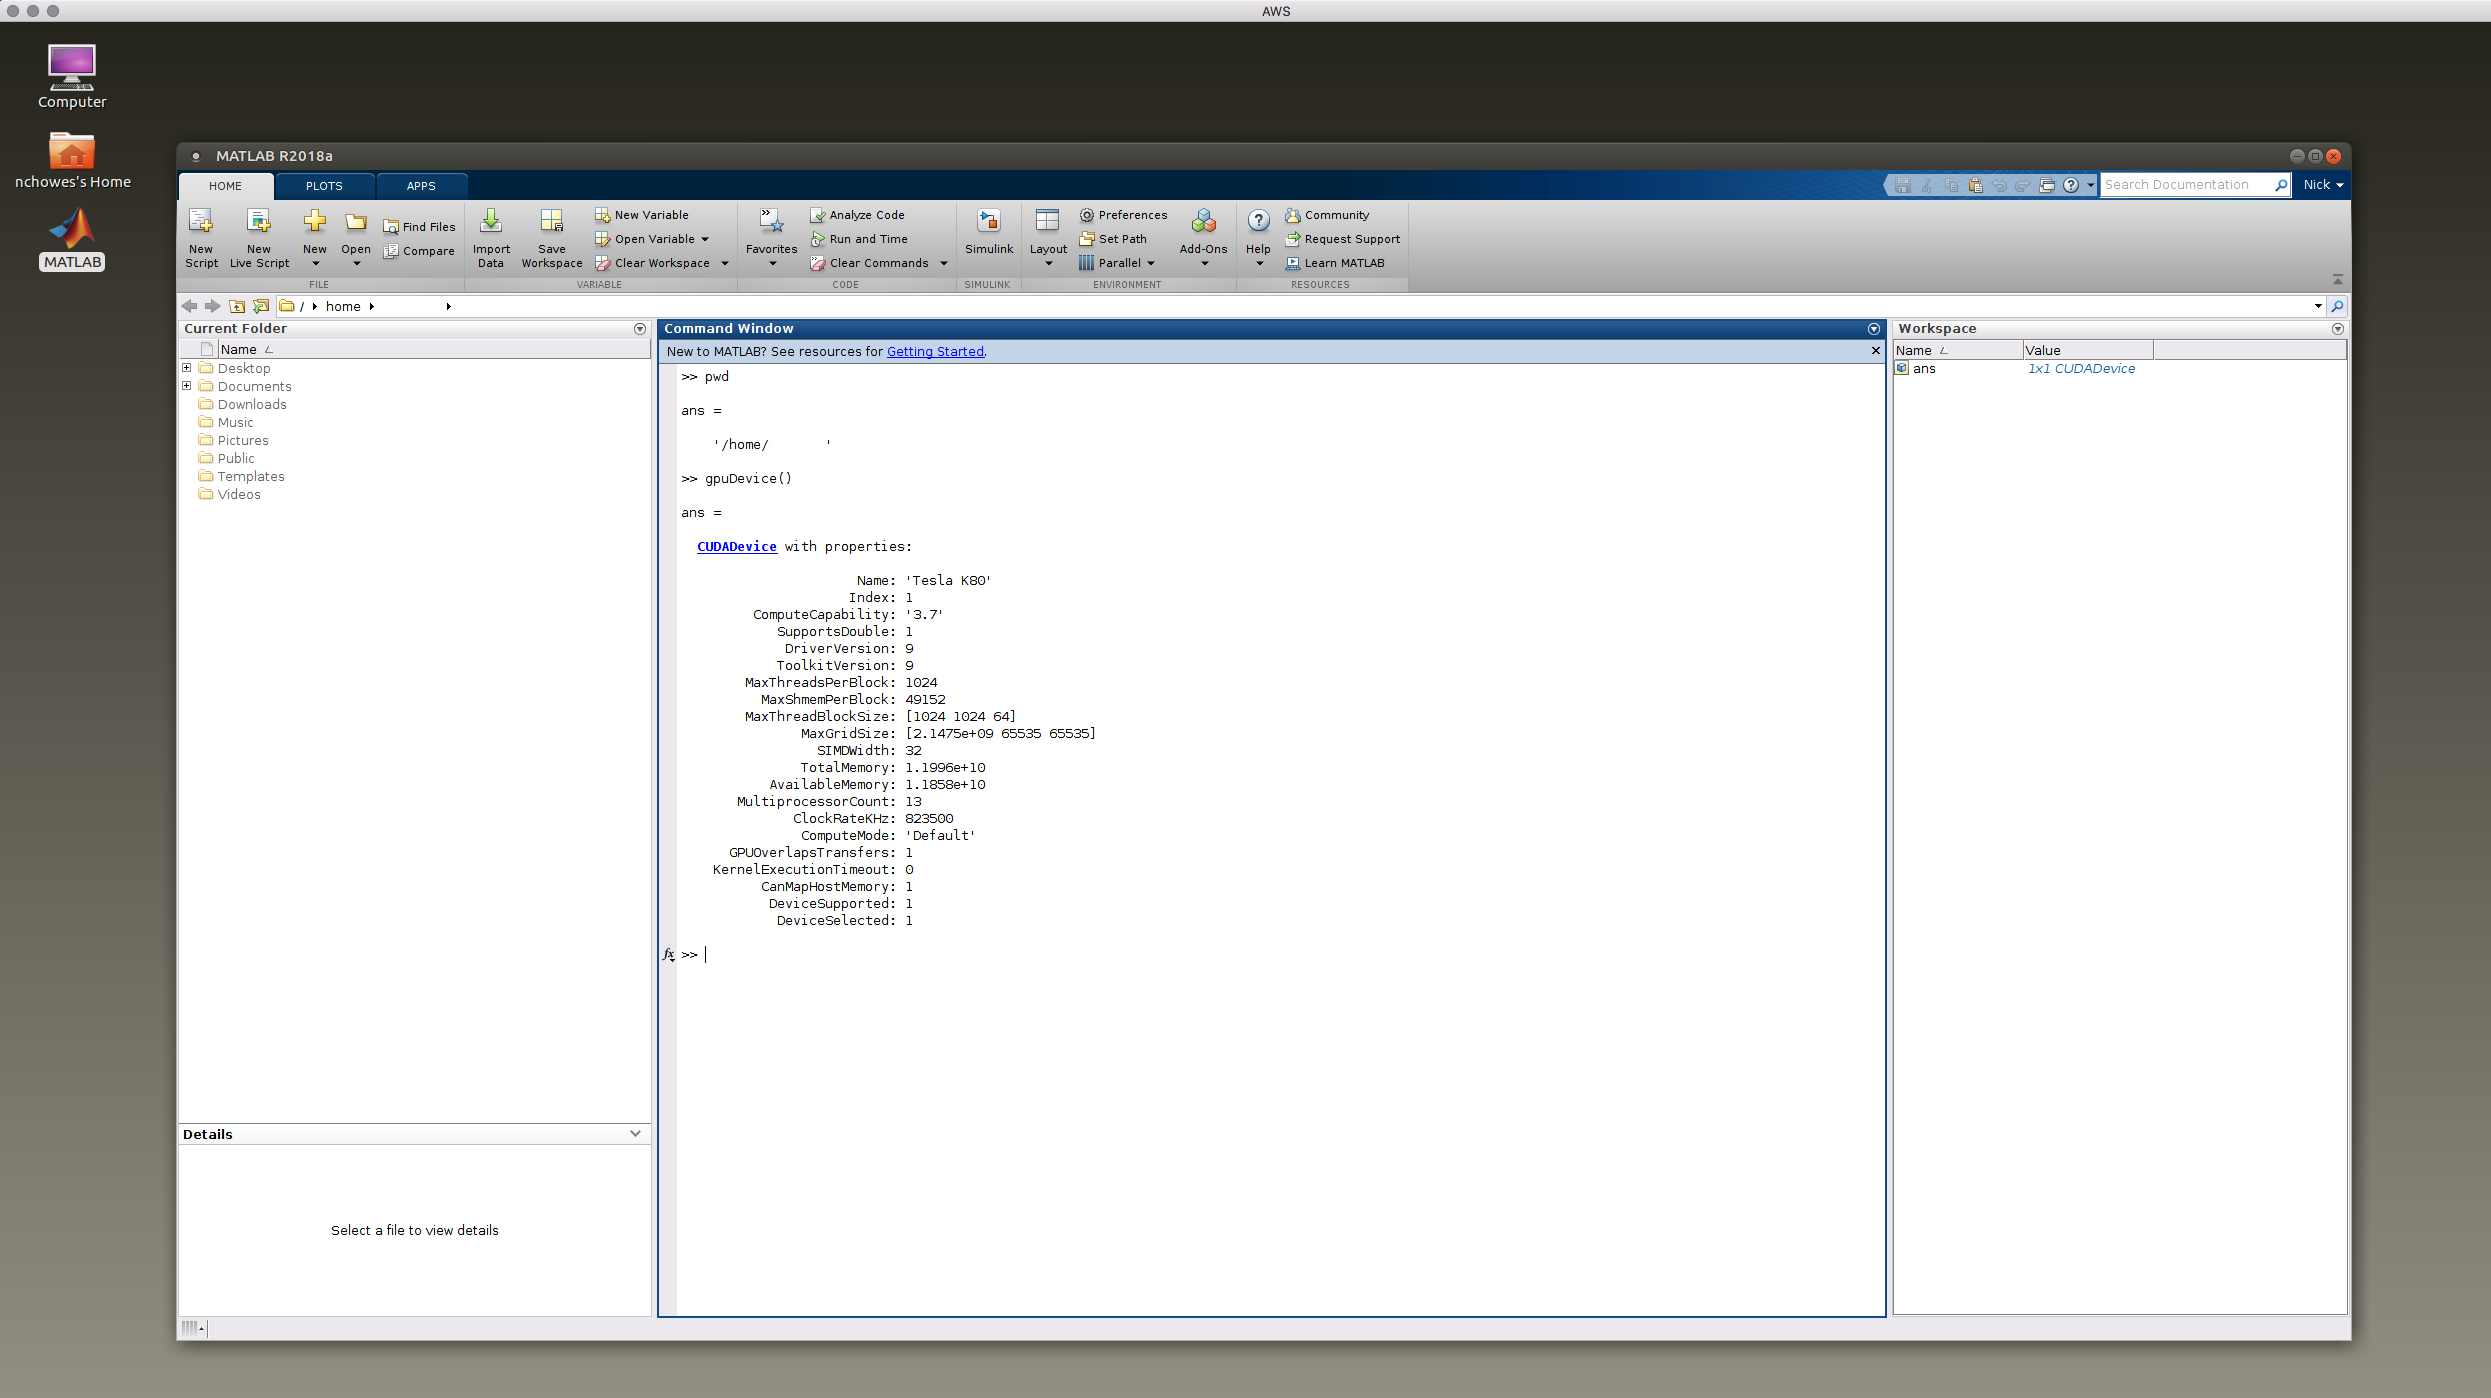 Figure 1: MATLAB running in the cloud with GPU support.
In terms of cost, the basic AWS option, a P2 instance with a single GPU, is ~$0.90 per hour (e.g. a ‘p2.xlarge’ with Tesla K80). Pricing will increase with the number of GPUs as well as type (e.g. P3 with Tesla V100). For the options, see the instance pricing where you will find instances that support GPU computing under the p2/p3 prefix.
Getting Started
Before setting up the image you will need to:
For the AWS account, I selected free tier. If you sign up for the free tier, it is possible that you will need to request a service limit increase in order to access a GPU instance from your account. The reference-architecture contains a link to do so. We will address this issue later.
For MATLAB cloud licensing, I followed the instructions and entered my license number under the individual license option. Generating a Key Pair will Results in a .pem file, which you browser downloads and you should save locally. As detailed in the AWS instructions, you will need to set the following permissions before you can use the .pem to connect to your AWS instance.
chmod 400 this-key-pair.pem
A key is required when connecting to the instance via SSH. While not needed for this recipe, at some point in the future you may want an SSH connection to transfer files or for configuration, in which case you will use the following syntax.
# For Ubuntu Machine (for AMI replace ubuntu with 'ec2-user')
ssh -i /path/this-key-pair.pem ubuntu@ec2-XX-XXX-XXX-XXX.compute-1.amazonaws.co
Creating the Instance
The reference-architecture relies on a CloudFormation template to deploy MATLAB on AWS. The end result will be a VM Platform running Ubuntu 16.04 and MATLAB R2018a. In the reference-architecture instructions, select ‘Launch Stack’ to open the template (Figure 2).
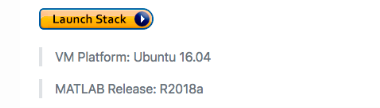
Figure 2: Launching the CloudFormation template from reference-architecture.
Next you will fill out the fields. While doing this, it is useful to keep the reference architecture open in a separate tab, so you can easily refer to the detailed descriptions/instructions that it contains for fields in the template.
Potential Pitfall: As I mention above, when selecting the ‘AWS EC2 Instance Type’ make sure it is a p2.* or p3.* instance type, otherwise it will not support a GPU.
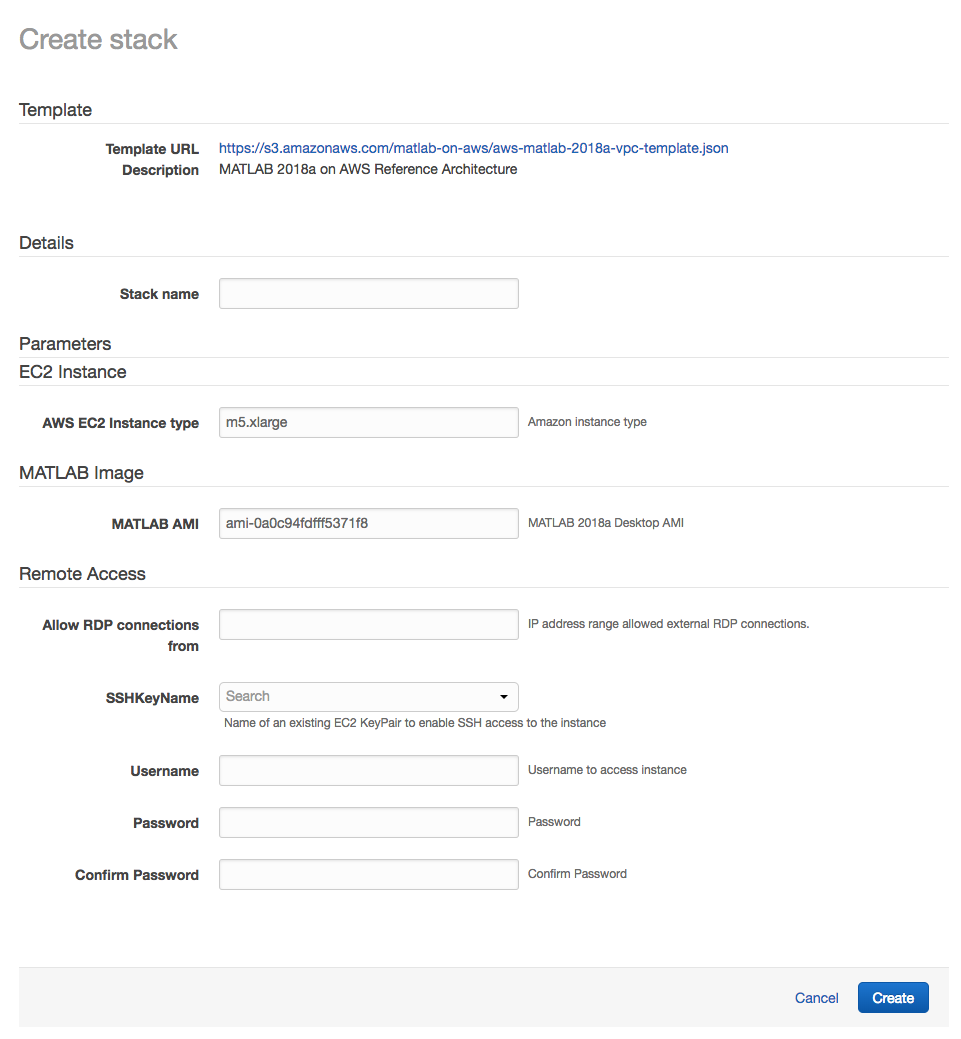 Figure 3: MATLAB with running in the cloud with GPU support.
The instructions note that it may take at least 20 minutes to create an instance, but in my experience it was much faster. When finished you should see ‘CREATE_COMPLETE’. If you see ‘ROLLBACK’, then something went wrong. If you have a free tier account and you expand the message, it is likely that you will find that you need to request a service limit increase in order to to add a P2 or P3 instance to your account. I requested a P2 instance, it was available within ~a half hour, and I repeated the steps above successfully.
To connect to the machine you will need to get the public DNS name. It is found in the Outputs of the Stack Detail page under the RDPConnection. It will look like this ec2-XX-XXX-XXX-XXX.compute-1.amazonaws.com. You will also want to note the username/password you entered in the template. This will be used when making remote desktop connection in the following section.
Connecting to the Cloud
This is the final step. You will need a remote desktop client. On my Mac, I use Microsoft Remote Desktop available from the Mac App Store. From the toolbar, create a ‘New’ desktop connection. Enter the public DNS name, which you copied from the Stack Detail page in the previous step (in my case, entered into the PC name field). You can also enter the username and password specified during template creation.
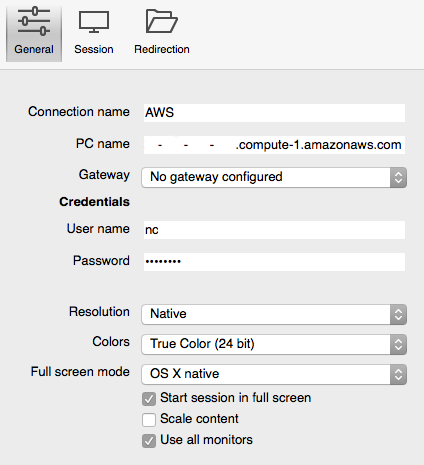
Figure 4: Remote desktop configuration
Start the connection! After a brief moment, you should see a desktop similar to Figure 1 with a MATLAB icon. The first time you launch the application there will be a short delay (a minute or two) for activation, so be patient. You’ll be prompted to log in with your MathWorks account. Make sure you have enabled your account for cloud use. See Enable your MATLAB license for Cloud in the Getting Started section. You’ll soon get the splash screen and the familiar desktop environment. Run gpuDevice() on the command line to query the GPU. You are now ready to train a deep learning model, or use a gpuArray to speed up a calculation and without any new hardware!
The reference-architecture lists the following resources as being installed/supported (I haven’t tried all of them)…
- MATLAB, Simulink, Toolboxes, GPU support
- Deep Learning Network Add-Ons: AlexNet, GoogLeNet,ResNet-50
Managing the Service
This one is really important if you are on a budget! You will want to manage your AWS EC2 instances to save money when not in use by stopping the machine from AWS console. To do so, log into the console and navigate to the EC2 service. You’ll find the stop/start option in Actions/Instance State (Figure 5). When the instance is stopped you only incur charges for VM storage. It is also recommended that you delete the stack when the machine is no longer needed altogether. Note that data and configurations will persist if you stop the machine, but not if you terminate the instance or delete the stack. When stopping the machine, the public IP and DNS name may change, so you will need to look these up using the AWS console and if different, update the remote desktop connection accordingly.
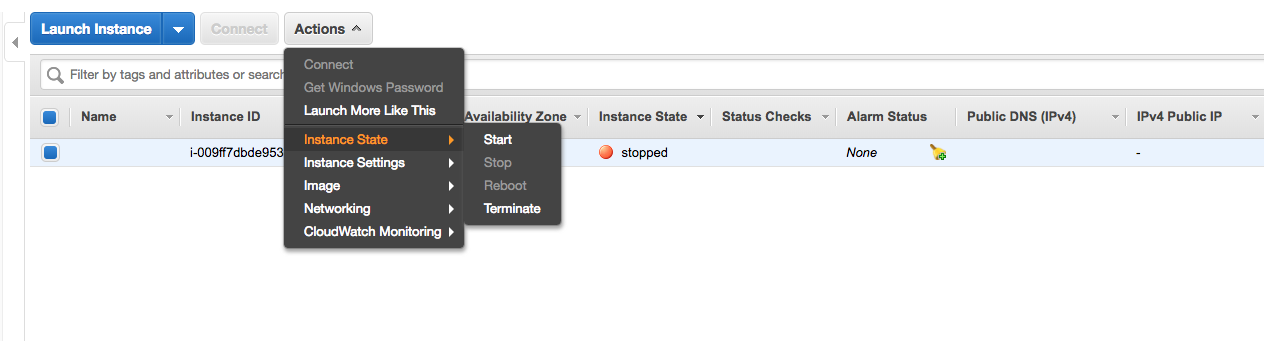
Figure 5: Start / Stop EC2 machine in AWS Console
The reference-architecture has an FAQ section with more details and useful information you should read. In particular, it outlines the steps to stop an instance when not in use (avoiding charges), which you are likely going to want to do.
Happy computing.